First-Time Setup
This guide walks you through the 3-step onboarding wizard that appears when you first enable the plugin.
🚀 Launching the Onboarding
The Onboarding Modal appears automatically when:
- You enable the plugin for the first time
- No Beancount file is configured in settings
Manual Launch:
Open Command Palette (Ctrl/Cmd + P) → "Obsidian Finance: Run Setup/Onboarding"
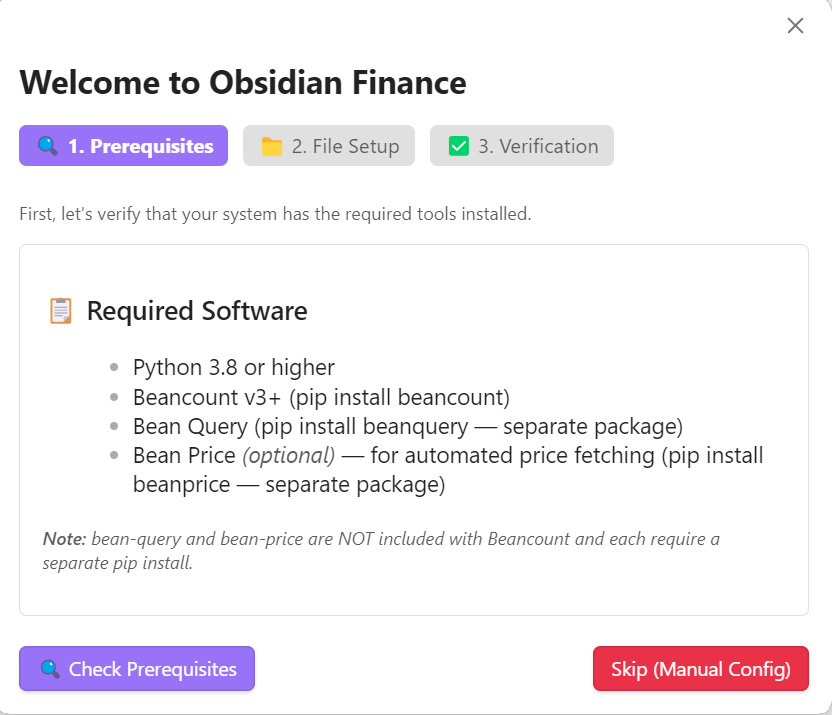
Step 1: Connect 🔌
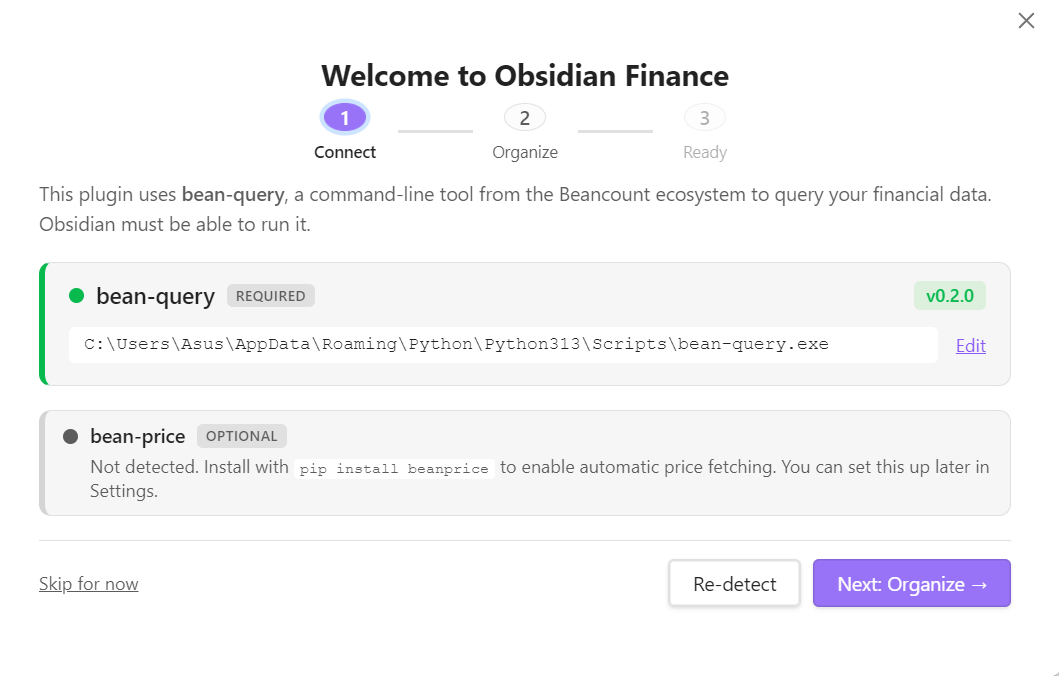
The plugin uses bean-query (a command-line tool from the Beancount ecosystem) to query your financial data. Obsidian must be able to detect and execute it.
Required & Optional Components
bean-query(Required): Essential for running BQL queries and powering the financial dashboard.bean-price(Optional): Used for automatic commodity price fetching.
Detection & Manual Verification
- Automatic Detection: Upon opening Step 1, the plugin automatically scans your system environment for
bean-queryandbean-price. - Manual Entry: If automatic detection fails, you can enter your exact executable command or absolute file path into the command input box.
- Common Command Values:
bean-query,wsl bean-query,/home/user/.local/bin/bean-query,/opt/homebrew/bin/bean-query
- Common Command Values:
- Verify: Click the Verify button to test execution and check the version output immediately.
In-Modal Installation Guides ("📦 How to install")
For convenience, Step 1 includes tabbed installation instructions directly inside the onboarding wizard:
🪟 Windows
- Install Python 3.8+ (make sure to check "Add Python to PATH" during installation).
- Open PowerShell and run:
pip install beancount beanquery beanprice - Verify in PowerShell:
bean-query --version - WSL Users: If you prefer running Beancount inside WSL, install it in your WSL distro and set
wsl bean-queryas your command.
🍎 macOS
- Open Terminal and run:
pip3 install beancount beanquery beanprice - Verify in Terminal:
bean-query --version - PATH Note for GUI Apps: macOS GUI applications do not automatically inherit
~/.local/binfrom your shell. If auto-detection fails, enter your full absolute path (e.g.,/Users/<your-username>/.local/bin/bean-query). Find it in Terminal withwhich bean-query.
🐧 Linux (AppImage / Deb)
- Open terminal and install via
pip(recommended):pip install --user beancount beanquery beanprice - Verify in terminal:
bean-query --version - System Packages Note: Installing Beancount via system package managers (
apt,dnf,pacman) often installs Beancount v2. You must installbeanqueryviapipseparately.
📦 Linux (Flatpak / Snap)
Flatpak (Recommended Setup):
- Install packages via pip on host machine:
pip install --user beancount beanquery beanprice - Find binary path by running
which bean-queryin terminal (e.g.,~/.local/bin/bean-query). - Grant Obsidian filesystem access to that directory using
flatpak override:sudo flatpak override --filesystem=~/.local/bin md.obsidian.Obsidian - Restart Obsidian completely so the Flatpak sandbox recognizes the filesystem permission change.
- Enter the full path (e.g.,
/home/user/.local/bin/bean-query) into the command box in Step 1 and click Verify.
Snap:
- Find absolute path on host running
which bean-query. - Enter full path into command box and click Verify.
- Confinement Note: If strictly confined Snap blocks host CLI execution, switch to the official AppImage or Flatpak release.
Step Controls
- Re-detect: Re-scans your system environment for
bean-queryandbean-price. - Skip for now: Bypasses CLI verification so you can proceed with setting up your ledger folder (Note: Dashboard features require
bean-queryto be configured later in Settings → Connection). - Next: Organize →: Proceeds to Step 2.
Step 2: Organize 📁
Choose how to start and configure your structured ledger folder layout. All your finance files will be organized inside a single folder in your vault.
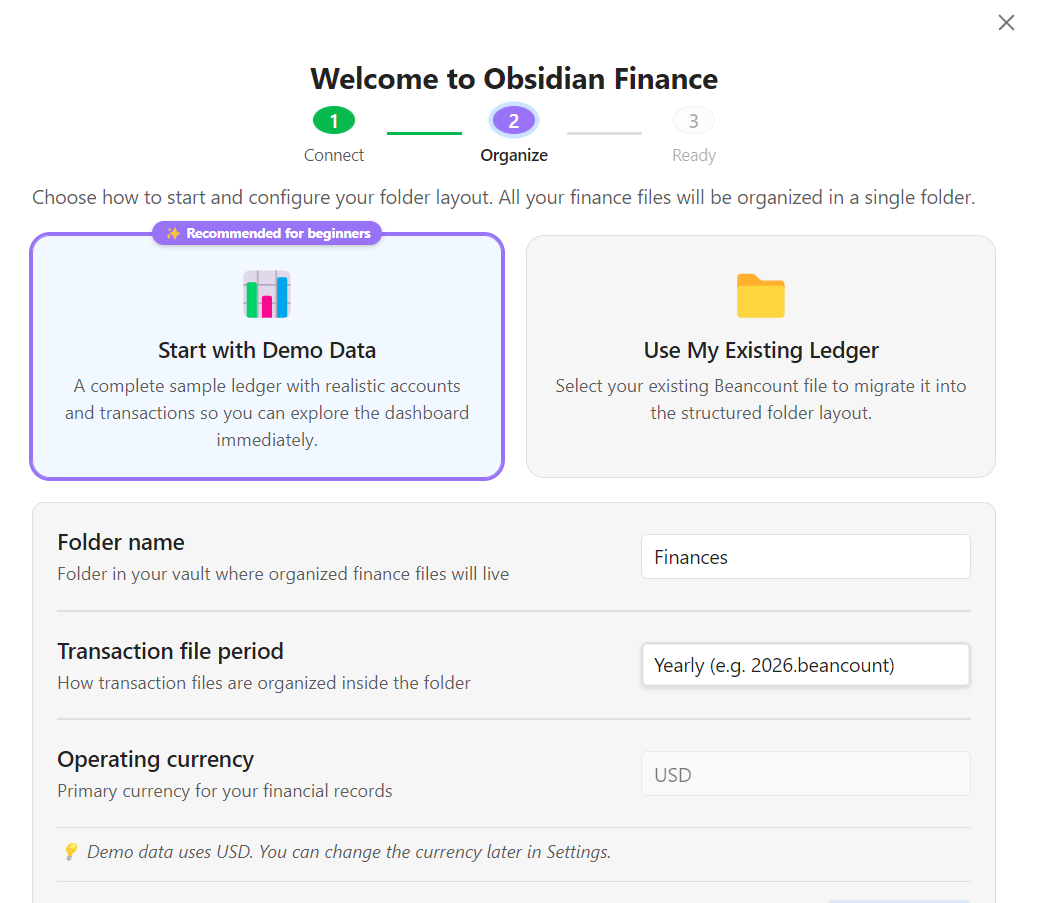
Data Choice Options
📊 Option 1: Start with Demo Data (Recommended for beginners)
- A complete sample ledger with realistic accounts, commodities, and transactions.
- Allows you to explore the dashboard immediately without existing files.
- Includes sample checking, savings, credit card, investment, income, and expense entries.
📁 Option 2: Use My Existing Ledger
- Select an existing
.beancountfile in your vault (or enter a path manually) to migrate it into the structured folder layout. - Note: Requires
bean-queryto be configured and verified in Step 1.
Configuration Options
- Folder name: Specifies the vault folder where organized finance files live (default:
Finances). - Transaction file period: Choose how transaction files are grouped inside
transactions/:- Yearly:
Finances/transactions/2026.beancount - Monthly:
Finances/transactions/2026/2026-07.beancount
- Yearly:
- Operating currency: Primary currency for your records (e.g.
USD,EUR,GBP). - Folder structure preview: Live tree view showing exact files and directories that will be created.
Step 3: Ready 🎉
After setup completes, Step 3 displays a success screen and configuration summary:
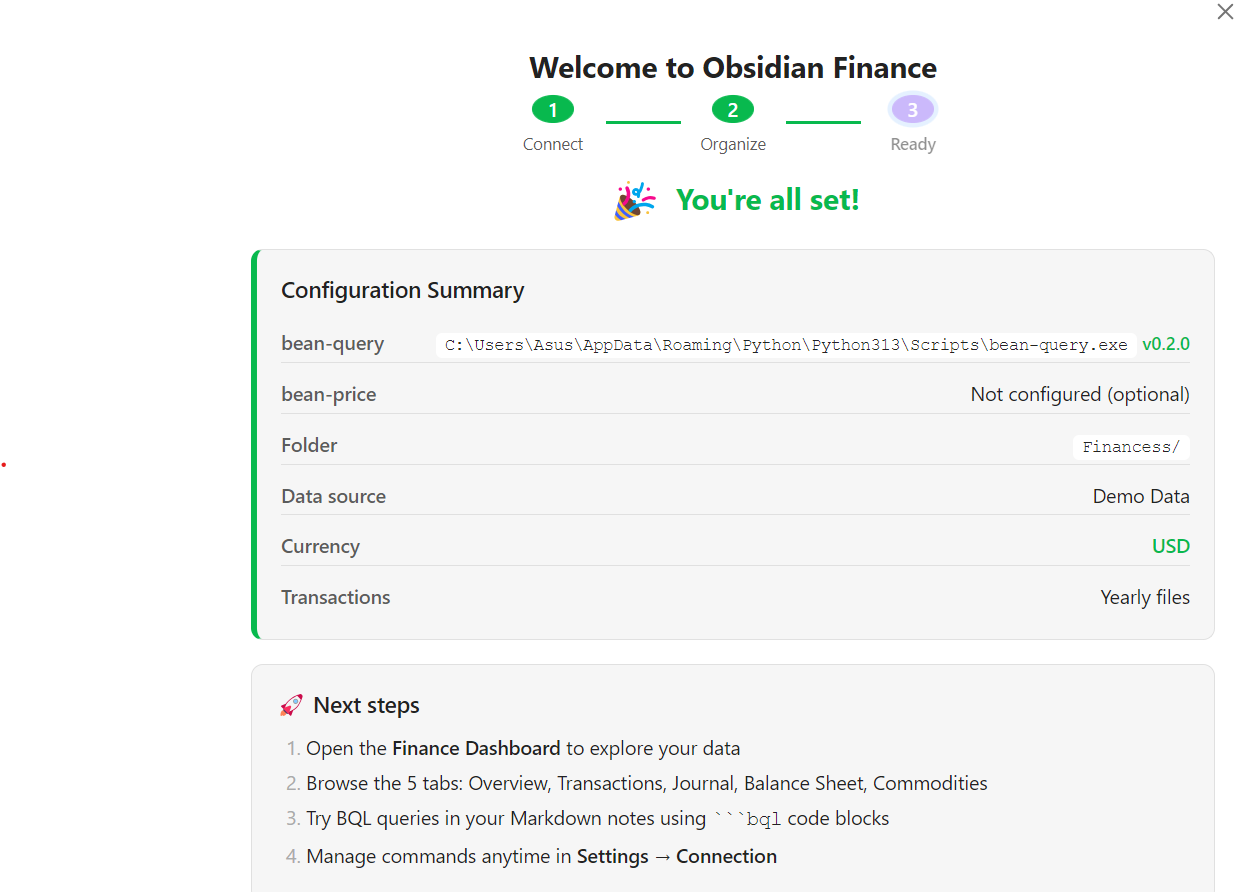
Configuration Summary
- bean-query Command & Version
- bean-price Status (Command or Not Configured)
- Structured Folder Location
- Data Source (Demo Data or Existing Ledger)
- Operating Currency
- Transaction Period (Yearly or Monthly)
Click "🚀 Open Dashboard" to finish setup and launch the unified Obsidian Finance dashboard!
Structured Layout
Both options create a structured folder layout by default. This modern organization approach keeps your ledger maintainable as it grows.
Why Structured Layout?
- Organized: Directives grouped by type
- Scalable: Works well for ledgers of any size
- Navigable: Easy to find specific entries
- Version Control: Better git diffs and merge handling
- Collaborative: Multiple people can work on different files
Folder Structure Created:
Finances/                      # Your chosen folder name
├── ledger.beancount          # Main file (includes all others)
├── accounts.beancount        # Account opening directives
├── commodities.beancount     # Commodity declarations
├── prices.beancount          # Price directives
├── balances.beancount        # Balance assertions
├── pads.beancount           # Pad directives
├── notes.beancount          # Note directives
├── events.beancount         # Event directives
└── transactions/            # Transaction files by period
    ├── 2024.beancount
    ├── 2025.beancount
    └── 2026.beancount
🔄 Re-running Onboarding
You can run the onboarding wizard anytime:
- Open Command Palette (
Ctrl/Cmd + P) - Type "Obsidian Finance: Run Setup/Onboarding"
- Follow the wizard to reconfigure or start fresh
Use Cases:
- Switching from demo data to real data
- Changing folder names or organization
- Importing a different ledger file
- Re-detecting or updating
bean-query/bean-pricecommands
⚙️ Post-Setup Configuration
After onboarding completes:
Verify Connection
- Open Settings → Beancount Ledger → Connection
- Check for green checkmarks on all tests
- If any tests fail, review the Troubleshooting Guide
Configure Preferences
- Operating Currency: Set your default currency (USD, EUR, etc.)
- Automatic Price Fetching: If
bean-pricewas detected, enable this in Settings → General to keep commodity prices up to date automatically - Performance: Adjust limits based on your ledger size
- BQL: Configure query display preferences
- Backups: Enable automatic backups (recommended)
🎓 Learning Path
For New Beancount Users
- Start with Demo Data: Explore the sample ledger
- Open Dashboard: See your financial overview
- Examine Transactions: Look at the demo entries in the Journal tab
- Try Editing: Modify a demo transaction to understand the workflow
- Learn BQL: Execute some sample queries
- Read Beancount Docs: Visit Beancount Documentation
For Existing Beancount Users
- Point to Your Ledger: Use existing file option
- Test Connection: Ensure
bean-queryworks - Explore Dashboard: See your real data visualized
- Try Features: Test transaction editing, BQL queries
- Consider Migration: Optionally migrate to structured layout
- Customize Settings: Adjust to your preferences
💡 Tips
Demo Data:
- Safe to experiment with - can't hurt your real finances
- Delete the demo folder anytime: just remove
Finances/folder - Great reference for Beancount syntax examples
File Paths:
- Use absolute paths for reliability
- WSL users: use
wsl bean-querycommand and Linux-style paths - Inside vault: plugin handles path conversion automatically
Structured Layout:
- Organized by directive type for better maintainability
- Recommended for all ledgers, especially those with > 500 transactions
- Easy to navigate and version control
🆘 Troubleshooting Onboarding
Onboarding Modal Doesn't Appear
- Check if onboarding is already completed in settings
- Manually run: Command Palette → "Obsidian Finance: Run Setup/Onboarding"
File Path Invalid
- Ensure the file exists and has
.beancountextension - Check file permissions (readable by Obsidian)
- For WSL: verify path format is correct
Bean-query Not Found
- Install Beancount & beanquery:
pip install beancount beanquery - Verify installation:
bean-query --versionin terminal - Set manual path in Connection settings or Step 1 manual command input if auto-detect fails
- If using Flatpak, grant filesystem permission via
flatpak override --filesystem=...
For more help, see the Troubleshooting Guide.