Using the + Button (Unified Modal)
The Unified Transaction Modal is the central interface for adding and editing financial directives in your ledger without having to write plain text.
🚀 Opening the Modal
You can open the modal in three ways:
- Ribbon Icon: Click the (+) icon in the left ribbon of Obsidian.
- Command Palette: Press
Ctrl/Cmd + Pand run the command "Add Beancount Transaction". - Hotkey: Assign a custom keyboard shortcut in Obsidian Settings → Hotkeys.
📝 Available Options & Form Fields
The modal contains four tabs corresponding to the main types of directives you can write to your ledger.
1. Transaction Tab
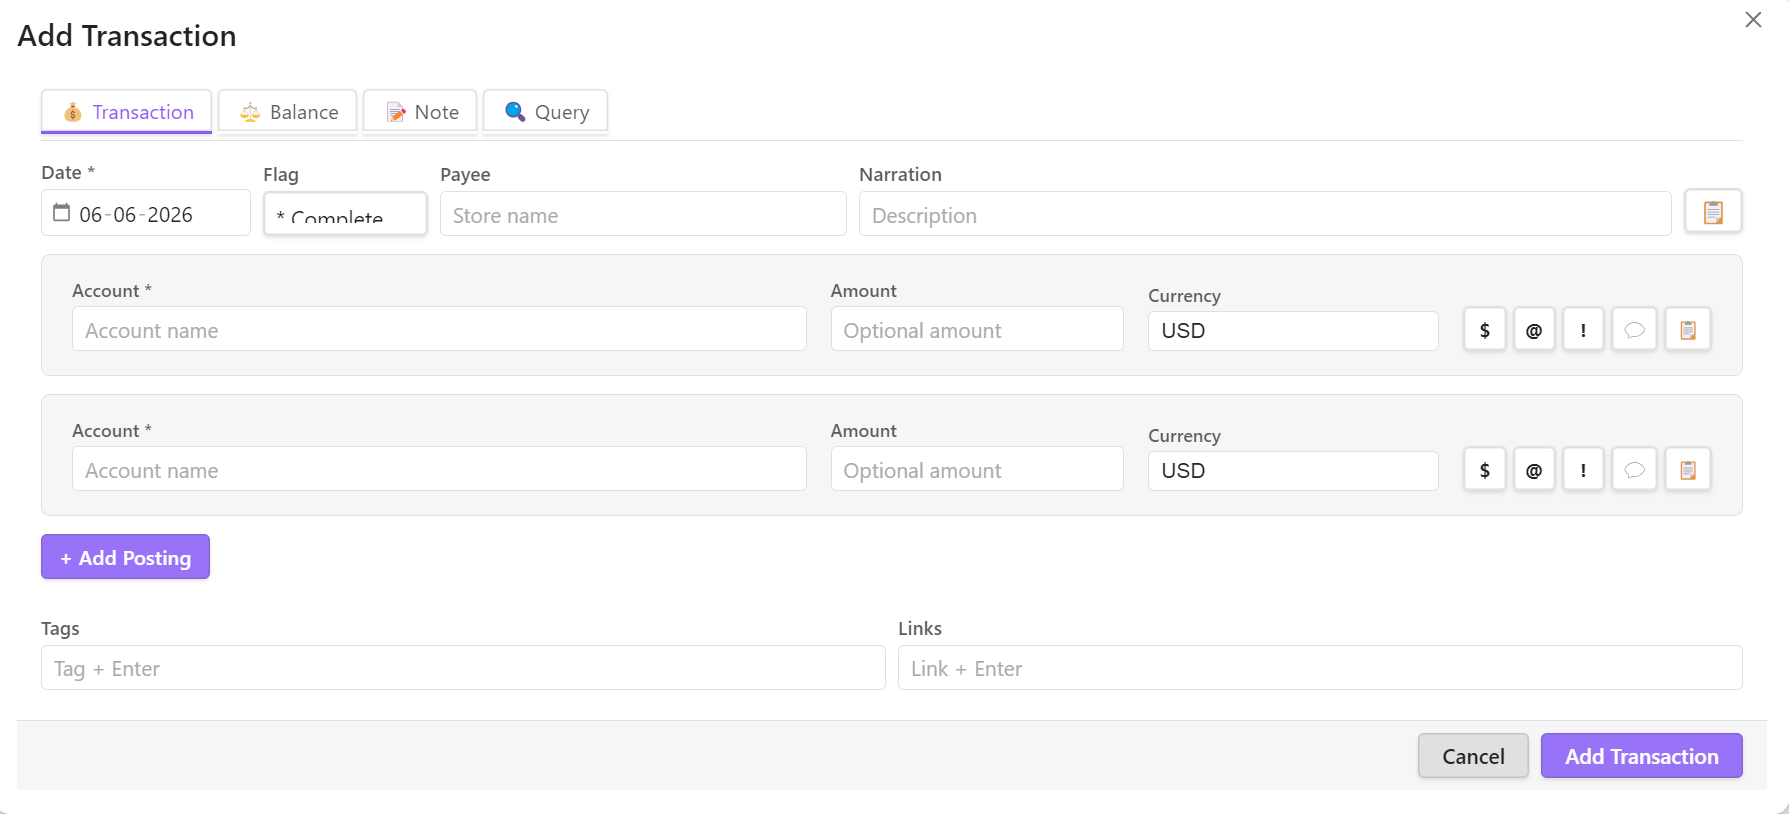
Used to record double-entry financial transactions (e.g. expenses, income, transfers).
- Date: Defaults to today. You can select a date using the picker.
- Flag: Status indicator (
*for completed,!for pending/unreconciled). - Payee & Narration:
- Payee: The merchant or party (e.g.
Amazon,Starbucks). - Description (Narration): A brief note about the transaction (e.g.
Office supplies). - Note: Both fields support auto-complete suggestions based on your existing ledger data.
- Payee: The merchant or party (e.g.
- Postings: Every transaction must have at least two postings (accounts and amounts) that balance to zero.
- Account: Dropdown menu featuring your account hierarchy (supports autocomplete).
- Amount: The numerical value and currency (e.g.,
-15.00 USD). - Auto-Balance: You can leave the amount field empty for one posting. Beancount will automatically calculate the matching balancing amount.
- Toolbar Buttons: Click the icons on the right of any posting line to open advanced fields:
- $ (Cost): Define cost basis (per-unit
{}or total{{}}) for stocks or crypto lots. - @ (Price): Define unit price (
@) or total price (@@) for currency conversions. - ! (Flag): Apply a posting-specific flag (
*or!). - 💬 (Comment): Append an inline comment (prefixed with
;in text). - 📋 (Metadata): Attach posting-specific metadata key-value pairs.
- $ (Cost): Define cost basis (per-unit
- Tags & Links:
- Tags: Type tag words (without
#) to categorize the transaction. - Links: Type link identifiers (without
^) to group related transactions.
- Tags: Type tag words (without
- Transaction Metadata: Click the 📋 icon in the header row to attach metadata keys (must be lowercase) and values to the overall transaction.
- Load Snippet: (Optional) Click the 📋 Load Snippet button in the modal footer (visible when user-defined snippets are enabled) to fuzzy-search your custom snippets and instantly pre-fill all transaction form fields.
2. Balance Tab
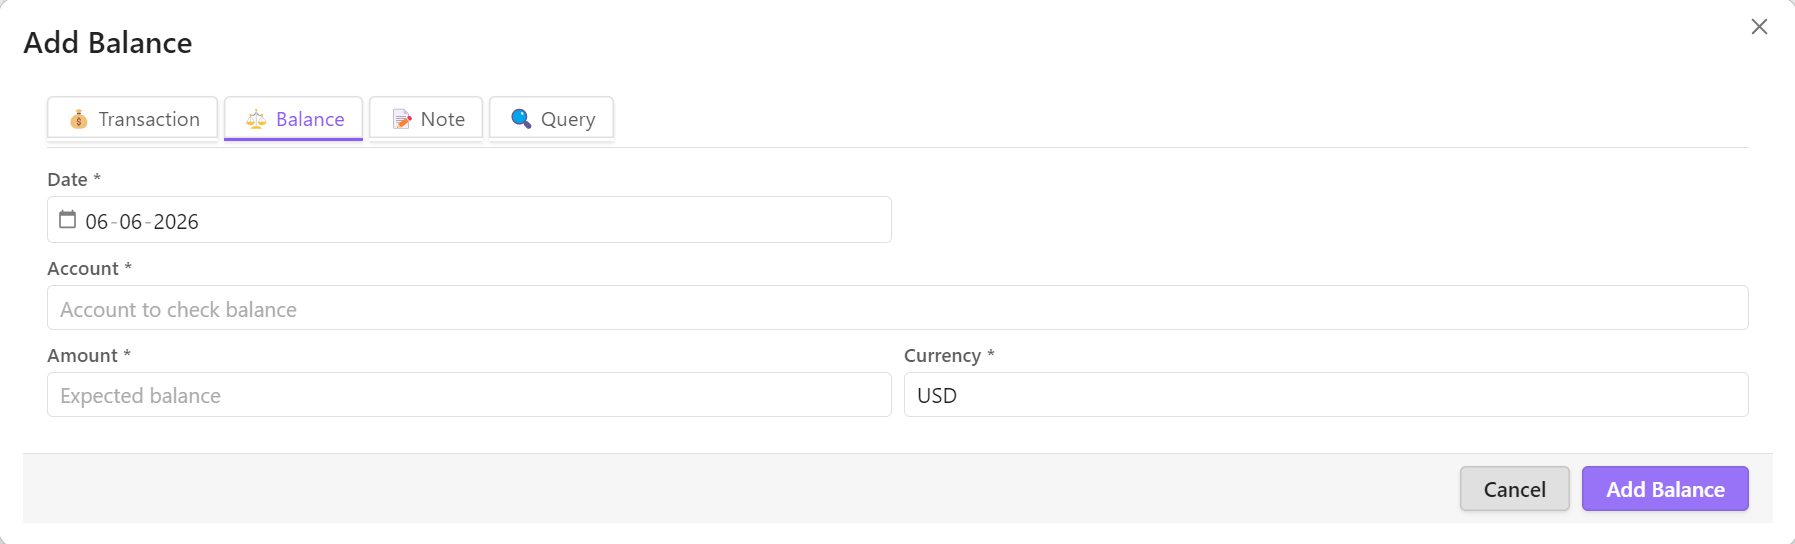
Used to assert the balance of a specific account at a point in time (crucial for reconciling bank accounts).
- Date & Account: Positioned adjacent to each other for a compact layout.
- Date: Date of the assertion.
- Account: The account being verified (e.g.
Assets:Checking).
- Amount: The expected balance (e.g.
1250.00 USD).
This writes a balance directive. If the actual calculated ledger balance does not match this amount, Beancount will raise a discrepancy error.
3. Note Tab
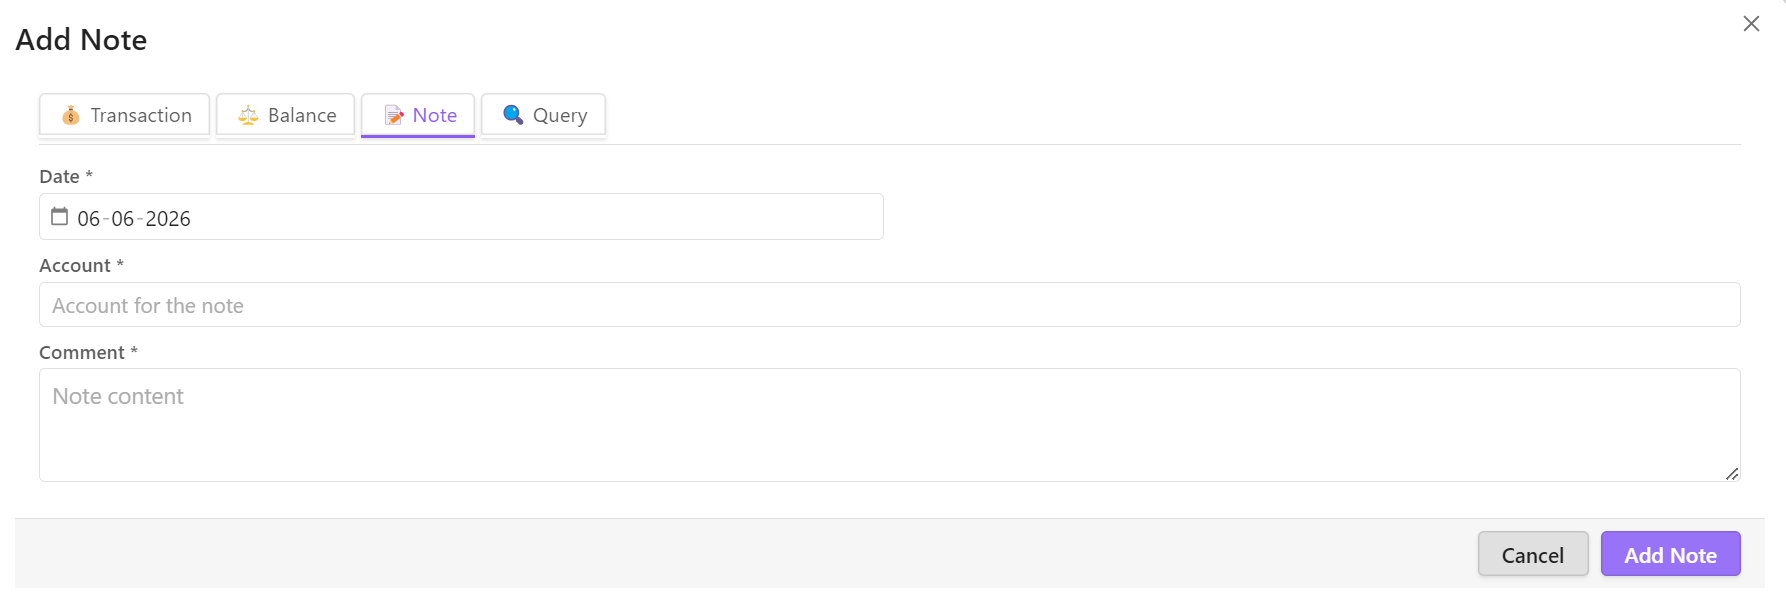
Used to attach an informational text comment to an account on a specific date.
- Date & Account: Positioned adjacent to each other for a compact layout.
- Date: The date of the note.
- Account: The target account (e.g.
Assets:Investments).
- Comment: The text description.
This writes a note directive to your ledger, which is shown on the Journal tab and associated note histories.
4. Query Tab
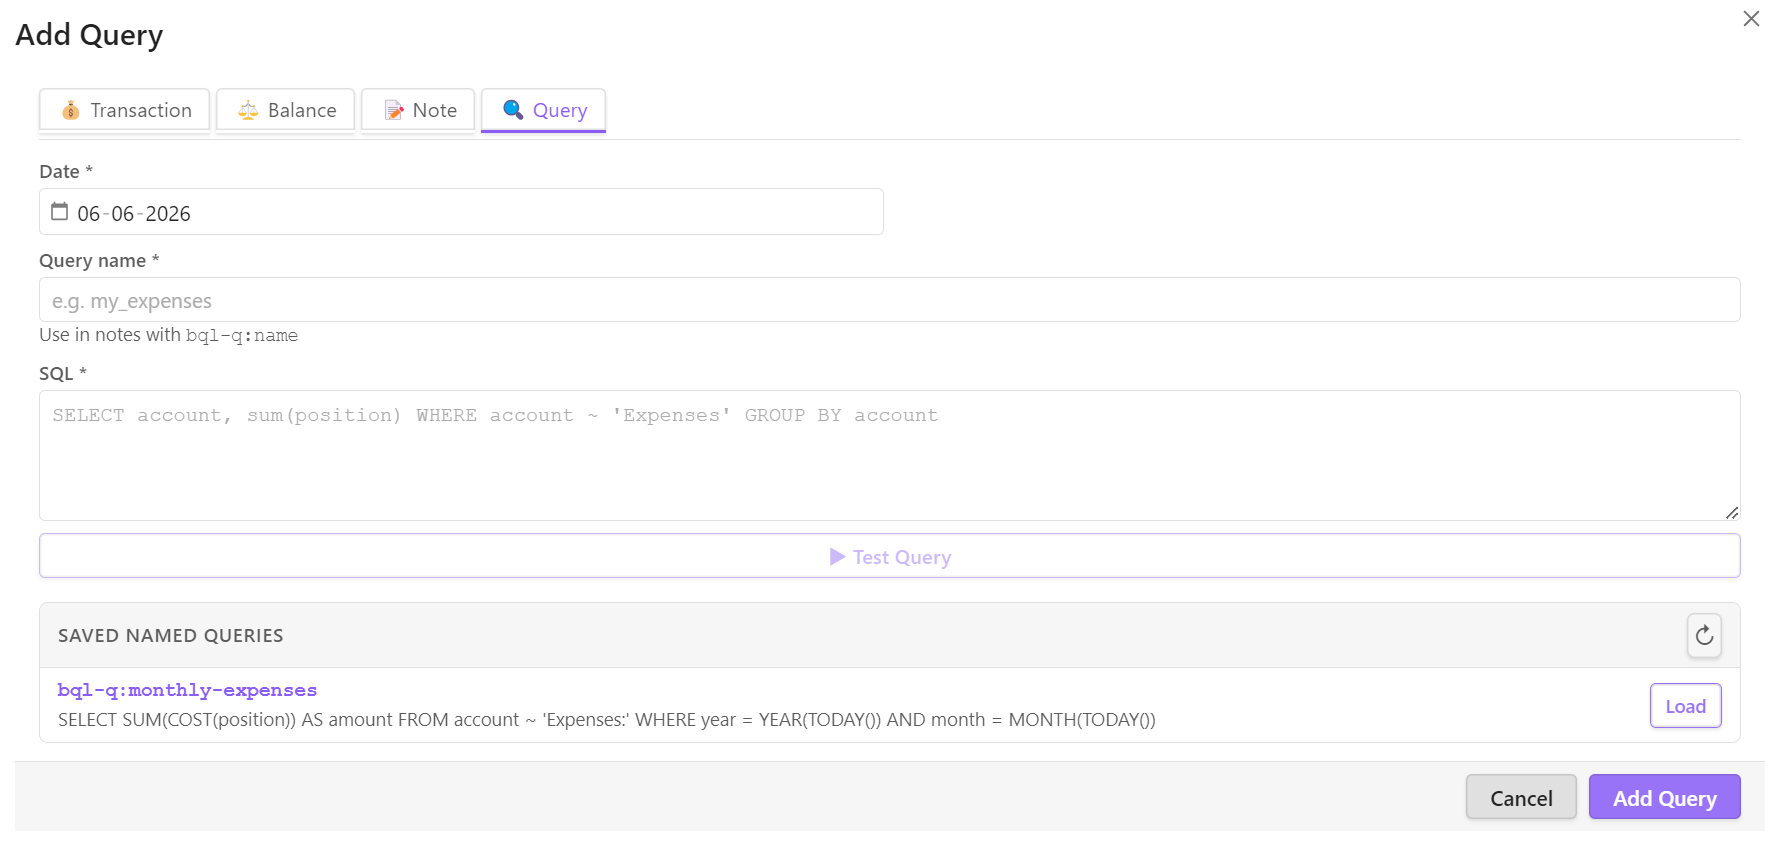
Used to define a named Beancount Query Language (BQL) query and save it inside your ledger files.
- Date & Query Name: Positioned adjacent to each other for a compact layout.
- Date: Date of the query directive (does not affect query execution).
- Query Name: A unique identifier. Must start with a letter; only letters, numbers,
-, and_are allowed.
- SQL (BQL Statement): The SQL-like query you want to save.
How It Works:
When you click save, the directive is written to queries.beancount in your structured layout folder:
2026-05-30 query "grocery_spending" "SELECT account, sum(position) WHERE account ~ 'Groceries' GROUP BY account"
You can then reference this query anywhere in your vault notes using single backticks:
My grocery spending:
`bql-q:grocery_spending`
The plugin instantly runs the saved BQL and displays the result inline.